Technical SEO Checklist: 25 Checks to Fix Your Site in 2026
Great content can’t rank if Google can’t find it, render it or trust it. That’s where technical SEO comes in. Most sites have hidden problems, like blocked pages, broken redirects or slow templates, that quietly limit their growth.
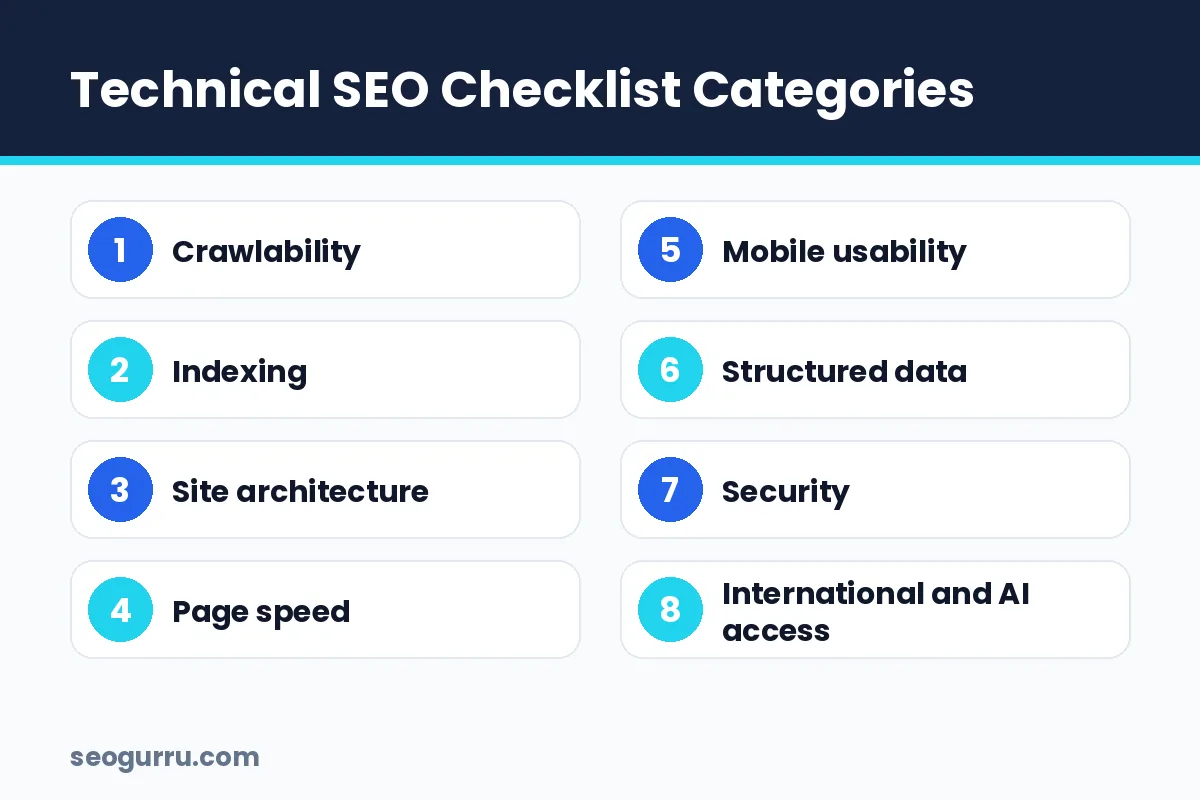
This technical SEO checklist gives you 25 practical checks grouped into eight categories. For each item, you’ll learn what to check, which tool to use and how to fix common problems. Use it for a full audit or work through one section a week.
A technical SEO checklist covers crawlability, indexing, site architecture, page speed, mobile usability, structured data, security and international setup. Start with Google Search Console’s Page indexing report, fix blocking errors first, then improve speed and structure.
What Is Technical SEO?
Technical SEO is the practice of optimizing a website’s infrastructure so search engines can crawl, render, index and understand its pages efficiently. It focuses on how your site works rather than what it says.
Think of it as the foundation of a house. Content and links are the furniture and decoration, but without a solid foundation, nothing else holds up.
Tools You’ll Need
- Google Search Console (free): indexing, Core Web Vitals and crawl data
- PageSpeed Insights (free): speed and Core Web Vitals per URL
- Screaming Frog SEO Spider (free up to 500 URLs): full site crawl
- Ahrefs Site Audit or Semrush Site Audit: automated issue detection
- Schema Markup Validator and Rich Results Test (free): structured data checks
1. Crawlability Checks
Check 1: Review robots.txt
Open yourdomain.com/robots.txt. Make sure you’re not blocking important folders, CSS or JavaScript files. A single Disallow: / line left over from a staging site can block your whole website.
Check 2: Submit and validate your XML sitemap
Your sitemap should list only indexable, canonical URLs that return a 200 status. Submit it in Google Search Console and check for errors.
Check 3: Find and fix broken links (404s)
Crawl your site with Screaming Frog. Fix internal links pointing to 404 pages, or redirect the dead URLs to the most relevant live page.
Check 4: Fix redirect chains and loops
Each redirect should go directly to its final destination. Chains like A → B → C waste crawl budget and dilute signals.
2. Indexing Checks
Check 5: Review the Page indexing report
In Search Console, open Indexing → Pages. Investigate reasons such as “Crawled – currently not indexed,” “Duplicate without user-selected canonical” and “Blocked by robots.txt.”
Check 6: Audit noindex tags
Make sure important pages don’t carry a noindex meta tag. This often happens after a site migration or plugin change.
Check 7: Set correct canonical tags
Every indexable page should have a self-referencing canonical, and duplicates should point to the preferred version. We cover this in detail in our upcoming canonical tags guide.
Check 8: Remove thin and duplicate pages
Tag archives, filtered URLs and near-empty pages can waste crawl resources. Noindex, consolidate or improve them.
3. Site Architecture Checks
Check 9: Keep important pages within three clicks
Key pages buried deep in your site get crawled less often. Use a flat, logical structure with clear categories.
Check 10: Use clean, descriptive URLs
Short URLs with keywords, like /technical-seo-checklist/, beat long strings of parameters and IDs.
Check 11: Strengthen internal linking
Link from high-authority pages to important pages using descriptive anchor text. Our internal linking strategy guide shows you how.
Check 12: Fix orphan pages
Orphan pages have no internal links pointing to them. Compare your crawl with your sitemap to find them, then link to them or remove them.
4. Page Speed and Core Web Vitals
Check 13: Pass Core Web Vitals
Check the Core Web Vitals report in Search Console. Aim for good scores on LCP (under 2.5 seconds), INP (under 200 milliseconds) and CLS (under 0.1). See our Core Web Vitals guide for fixes.
Check 14: Compress and modernize images
Convert images to WebP or AVIF, size them correctly and lazy-load images below the fold.
Check 15: Minimize render-blocking resources
Defer non-critical JavaScript, inline critical CSS and remove unused plugins and scripts.
Check 16: Use caching and a CDN
Enable browser and server caching, and serve static assets through a content delivery network.
5. Mobile Usability
Check 17: Confirm mobile-first readiness
Google primarily crawls with a smartphone user agent. Make sure your mobile pages contain the same content, links and structured data as desktop.
Check 18: Check tap targets and font sizes
Buttons should be easy to tap, and text should be readable without zooming.
6. Structured Data
Check 19: Add relevant schema markup
Use Organization, Article, Product, LocalBusiness, FAQPage or BreadcrumbList where appropriate. Our schema markup guide explains each type.
Check 20: Validate structured data
Test with Google’s Rich Results Test and fix errors and warnings shown in Search Console’s Enhancements reports.
7. Security and Accessibility
Check 21: Use HTTPS everywhere
Your whole site should load on HTTPS, with HTTP URLs redirecting via 301 redirects. Fix mixed-content warnings.
Check 22: Return the right status codes
Deleted pages should return 404 or 410, moved pages should return 301, and server errors (5xx) should be rare.
8. International SEO and AI Crawler Access
Check 23: Implement hreflang correctly
If you target multiple languages or countries, use hreflang tags with return links and self-references.
Check 24: Allow AI and search crawlers you want
Review robots.txt and firewall rules for Googlebot, Bingbot, OAI-SearchBot and PerplexityBot. Blocking them can remove you from AI search answers. Consider adding an llms.txt file as a low-effort extra.
Check 25: Monitor log files or crawl stats
Use Search Console’s Settings → Crawl stats report or server logs to see how often Google crawls your pages and whether it hits errors.
- Fix crawl-blocking and indexing errors before anything else.
- Speed and mobile usability affect both rankings and conversions.
- Re-run this checklist quarterly and after every redesign or migration.
Technical SEO Tips for WordPress Sites
WordPress powers a large share of the web, and it has its own common technical issues. If your site runs on WordPress, check these too:
- Disable unused archives. Author, date and tag archives often create thin duplicate pages. Noindex them in your SEO plugin if they add no value.
- Limit plugins. Every plugin adds code. Remove anything you don’t use and replace heavy page builders on key templates where possible.
- Use a caching plugin. Tools like LiteSpeed Cache or WP Rocket handle page caching, minification and image optimization.
- Check attachment pages. Make sure media attachment URLs redirect to the file or parent post instead of creating thin pages.
- Keep everything updated. Outdated themes and plugins cause security and performance problems.
Example: What a Real Audit Often Finds
Here’s a typical set of findings from a 300-page small business site:
| Issue found | Impact | Fix |
|---|---|---|
| 42 internal links to 404 pages | Wasted crawl, poor UX | Updated links, added 301s |
| Staging subdomain indexed | Duplicate content | Added noindex and password protection |
| LCP of 4.8s on mobile | Weak page experience | Compressed hero images, deferred scripts |
| 18 orphan service pages | Low crawl frequency | Added links from menus and hub pages |
| No structured data | Missed rich results | Added Organization, LocalBusiness, FAQ schema |
None of these issues were visible to the business owner, yet together they held back rankings for months. That’s why a structured checklist matters.
How to Prioritize Technical SEO Fixes
Not all issues are equal. Use this order:
- Critical: anything blocking crawling or indexing of key pages
- High: broken pages, redirect problems, duplicate content, HTTPS issues
- Medium: Core Web Vitals, internal linking, orphan pages
- Low: minor warnings, missing alt text on decorative images
Frequently Asked Questions
What should be included in a technical SEO checklist?
A technical SEO checklist should cover robots.txt, XML sitemaps, indexing status, canonical tags, redirects, broken links, site architecture, internal linking, page speed, Core Web Vitals, mobile usability, structured data, HTTPS, hreflang and crawler access.
How often should I run a technical SEO audit?
Run a full technical SEO audit at least once a quarter, and always after a redesign, CMS change, domain migration or major plugin update. Monitor Google Search Console weekly for new errors.
Can I do technical SEO myself?
Yes, many checks are beginner-friendly using free tools like Google Search Console and PageSpeed Insights. Complex issues, such as JavaScript rendering, migrations or large-scale indexing problems, often benefit from an experienced technical SEO specialist.
What is the most important technical SEO factor?
Crawlability and indexability come first. If search engines can’t access and index your pages, nothing else matters. After that, page speed, mobile usability and site structure have the biggest impact.
Conclusion
Technical SEO is the foundation that lets your content and links do their job. Work through this checklist in order: fix crawling and indexing first, then architecture, speed, mobile, structured data and security. Re-check every quarter, because websites change constantly.
Want an expert to run this checklist for you? Our technical SEO services and SEO audit services uncover hidden issues fast, or you can start with a free SEO analysis.